This demo will be a good start to explore TextDynamic. In directory Demos\NET1\SimMDI you will find a C# project for Delphi 2006 and for VS2003, in Demos\NET1\SimMDI_VB is a VB.NET project written using VS 2003. In directory Demos\NET2\CS\SimMDI is a C# demo for VS 2005.
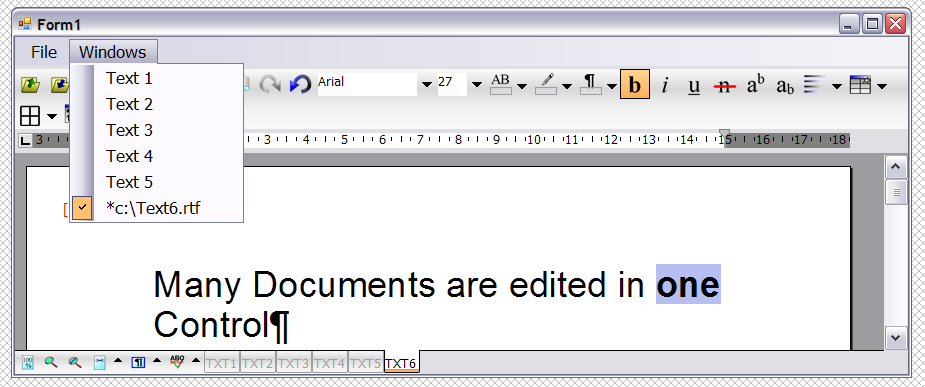
TextDynamic has the ability to store several documents in one editor. If you create a "double editor" you can work with 2 texts in two editor windows. But this is not what is meant here. Here we show how to create many documents and hold them all in the editor. We can switch between them and remove the documents if required. This all works like the MDI example only that just one editor is used.
In the demo directory you will find a C# projects for Delphi 2006 and Visual Studio 2005
Advantages:
- The zooming state will remain the same for all documents
- Other properties, such as spellcheck mode stays the same
- Resources are saved
- No external toolbar is required
- Undo still works for the individual document
- When switching between editors the previous cursor position is restored
Disadvantages:
- You cannot tile the windows
- It is difficult to display more documents at the same time (using a double editor it is possible to show 2, but keeping track is more complicated)
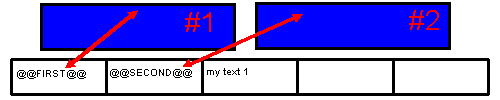
The simulated MDI demo uses the "RTFData" API. Using this you can create a different RTFData element in the internal list of TextDynamic, give it a name and a caption (for the tabset) and activate it or delete it.
The RTFData API is defined in interface IWPMemo:
void RTFDataAdd(string Name, string Caption) // create a new element
bool RTFDataSelect(string Name) // select an element
void RTFDataDelete(string Name) // delete an element
void RTFDataAppendTo(string Name, bool CreateNewPage) // append the current text to the given element (maybe create it)
Please make sure you select a different one before you delete an element. By default the editor #1 use the element with the name @@FIRST@@, the optional editor #2 uses @@SECOND@@. You can always "return" to the first element.
RTFDataAdd will first check if it is required to create a new element. If not, it will just set the caption. (The caption can be displayed in the tabset "PanelH2")
We use method RTFDataAppendTo in the label printing example. It is very useful in combination with mail merge since you can create a document from multiple copies of the same text - without the need to activate the editor #2!
In our simulated MDI example we create a simple form, place a TextDynamic control.
The text control is initialized in Form.OnLoad:
private void WinForm_Load(object sender, System.EventArgs e)
{
// wpdllInt1.EditorStart( your_name, your_key );
// Load the PCC file (no password)
wpdllInt1.SetLayout(".\\buttons.pcc","");
// Initialize the editor
wpdllInt1.SetEditorMode(
// as single editor
EditorMode.wpmodSingleEditor ,
EditorXMode.wpmodexToolbarLG|
EditorXMode.wpmodexPDFExport|
EditorXMode.wpmodexSpellcheck|
EditorXMode.wpmodexTables,
EditorGUI.wpguiRuler|
EditorGUI.wpguiHorzScrollBar|
EditorGUI.wpguiVertScrollBar|
EditorGUI.wpguiPanelH1,
EditorGUI.wpguiDontSet);
// see: http://www.wpcubed.com/manuals/tdref/IDH_WPDLLInt_SetLayoutMode.htm
wpdllInt1.SetLayoutMode(7,1,100);
// Set Size - align to complete window
wpdllInt1.SetBounds(
ClientRectangle.Left,
ClientRectangle.Top,
ClientRectangle.Right-ClientRectangle.Left,
ClientRectangle.Bottom-ClientRectangle.Top );
wpdllInt1.Anchor =
AnchorStyles.Left|AnchorStyles.Right
|AnchorStyles.Top|AnchorStyles.Bottom;
}
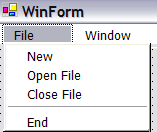
Now we add a main menu with two main items and some items in the first, the File menu. In the .NET 2 example we used a MenuStrip. (Instead of MenuItems use DropDownItems!)
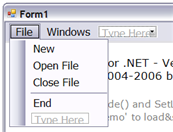
To keep track of the loaded files we can use the item list in the "Window" menu. We could also use a string list or combo box.
We need a new MenuItem class which can store a custom string value, "RTFID".
.NET 1.1
public class TagMenuItem : System.Windows.Forms.MenuItem
{
public string RTFID;
}
.NET 2.0
public class TagMenuItem : System.Windows.Forms.ToolStripMenuItem
{
public string RTFID;
}
This function create a new menu item and add a RTF data element. There is also the OnClick event handler which selects a data element.
private int textnr = 0;
private TagMenuItem currentmenu;
private void TagMenuItem_Click(object sender, System.EventArgs e)
{
wpdllInt1.Memo.RTFDataSelect(((TagMenuItem)sender).RTFID);
wpdllInt1.Memo.TextCommand(5,0,0);
currentmenu = ((TagMenuItem)sender);
for(int i=0;i<WindowMenu.MenuItems.Count;i++)
WindowMenu.MenuItems[i].Checked = false;
/* .NET 2 code:
for (int i = 0; i < WindowMenu.DropDownItems.Count; i++)
((ToolStripMenuItem)WindowMenu.DropDownItems[i]).Checked = false;
*/
currentmenu.Checked = true;
}
private TagMenuItem AddANewFile()
{
TagMenuItem men = new TagMenuItem();
men.Click += new System.EventHandler(this.TagMenuItem_Click);
men.Text = "Text " + Convert.ToString(++textnr);
men.RTFID = "TXT" + Convert.ToString(textnr);
WindowMenu.MenuItems.Add(WindowMenu.MenuItems.Count,men);
//.NET 2: WindowMenu.DropDownItems.Add(men);
wpdllInt1.Memo.RTFDataAdd(men.RTFID,men.RTFID);
wpdllInt1.Memo.RTFDataSelect(men.RTFID);
men.RadioCheck = true;
for(int i=0;i<WindowMenu.MenuItems.Count;i++)
WindowMenu.MenuItems[i].Checked = false;
/* .NET 2 code:
for (int i = 0; i < WindowMenu.DropDownItems.Count; i++)
((ToolStripMenuItem)WindowMenu.DropDownItems[i]).Checked = false;
*/
men.Checked = true;
currentmenu = men;
wpdllInt1.Memo.TextCommand(5,0,0);
CloseFile.Enabled = (WindowMenu.MenuItems.Count>1);
return men;
}
We use this code in the click events:
New:
private void NewFile_Click(object sender, System.EventArgs e)
{
AddANewFile();
}
Open:
private void OpenFile_Click(object sender, System.EventArgs e)
{
TagMenuItem old, men;
old = currentmenu;
men = AddANewFile();
if(!wpdllInt1.Memo.Load("",""))
{
if(old!=null)wpdllInt1.Memo.RTFDataSelect(old.RTFID);
else wpdllInt1.Memo.RTFDataSelect("");
wpdllInt1.Memo.ReformatAll(false, true);
}
else men.Text = wpdllInt1.Memo.LastFileName;
}
Close:
private bool AbortClose; // this is needed later
private void CloseFile_Click(object sender, System.EventArgs e)
{
if((currentmenu!=null)
&&(wpdllInt1.Memo.TextCommand(3,0,0)!=0) // CANCLOSE
)
{
if(WindowMenu.MenuItems.Count>1)
{
string s;
s = currentmenu.RTFID;
currentmenu.Dispose(); TagMenuItem_Click(WindowMenu.MenuItems[0],null);
wpdllInt1.Memo.RTFDataDelete(s);
}
else
{
wpdllInt1.Memo.Clear(false, false);
wpdllInt1.Memo.TextCommand(5,0,0);
}
} else AbortClose = true;
}
It would be nice to update the menu captions show the current file name when the file was saved under a new name. We also insert an asterix if the file was modified.
private void wpdllInt1_OnNotify(object Sender, int Editor, int MsgID)
{
if ((currentmenu!=null)&&((MsgID==27)||(MsgID==28)))
currentmenu.Text =
((wpdllInt1.Memo.Modified)?"*":"")+
wpdllInt1.Memo.LastFileName;
}