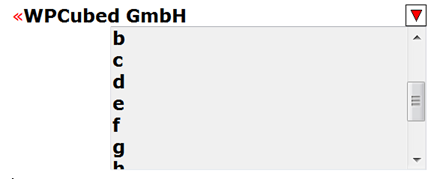
The object classes make it fairly easy to create a drop down field for an edit field.
Edit fields are standard mail merge fields (they are paired objects) which also use the mode wpWithinEditable.
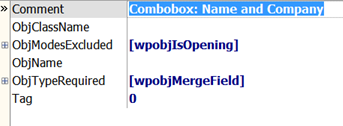
We need 2 class items.
(A) This is used for the closing objects, here we display the drop down button.
We need this event handler:
OnObjectClassPaintBackground - do not paint anything:
...
begin
Handled := true;
end;
OnObjectClassPaint - paint the usual triangle:
...
var a : Integer;
begin
a := XRes div 20;
//Canvas.Brush.Color := clWhite;
if r.Right-r.Left>Xres div 5 then
r.Left := r.Right - Xres div 5;
Canvas.Pen.Width := 0;
Canvas.Pen.Color := clBlack;
Canvas.Rectangle(r.Left, r.Top, r.Right, r.Bottom);
Canvas.Brush.Color := Canvas.Font.Color;
Canvas.Polygon( [Point(r.Left+a, r.Top+a),
Point(r.Right-a, r.Top+a),
Point((r.Right+r.Left)div 2, r.Bottom-a)] );
PaintContinue := [wpSuppressUnderline];
end;
OnObjectClassMouseDown - use a TListbox "FORMCOMBO_Listbox" which has been on the form to be displayed as drop down list.
We also use special code to assign the current font attributes to this listbox. This code is of course optional. We also require a global variable to store the current field name. This can be a string, in our example CurrField.
...
var AttrInterface : TWPAbstractCharAttrInterface;
begin
if TWPCustomRtfEdit(Sender).GetObjXYBottomlineScreen(TextObj,x,y,true) then
begin
CurrField := TextObj.Name;
dec(x, FORMCOMBO_Listbox.Width); // right aligned
AttrInterface := TextObj.ParentPar.GetCharAttrInterface(TextObj.ParentPosInPar);
AttrInterface.AssignTo(FORMCOMBO_Listbox.Font);
AttrInterface.Free;
FORMCOMBO_Listbox.Parent :=Sender;
FORMCOMBO_Listbox.Tag := TWPCustomRtfEdit(Sender).TopOffset;
FORMCOMBO_Listbox.Left := x; // +Sender.Left;
FORMCOMBO_Listbox.Top := y; //+Sender.Top;
if TextObj.NameIs('Name') then
FORMCOMBO_Listbox.Items.Text := PicName.Lines.Text
else FORMCOMBO_Listbox.Items.Text := PicCompany.Lines.Text;
FORMCOMBO_Listbox.Visible := TRUE;
FORMCOMBO_Listbox.SetFocus;
IgnoreMouse := true;
end ;
end;
To hide the list box we use the standed TWPRichText.MouseDown event
procedure TForm1.WPRichText1MouseDown(Sender: TObject; Button: TMouseButton;
Shift: TShiftState; X, Y: Integer);
begin
FORMCOMBO_Listbox.Visible := false;
end;
(B) This class item is used only to hide the start insert point.
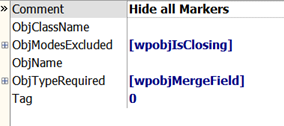
We only use the event OnObjectClassCalcSize to set the width to 0.
...
begin
if Sender=WPRichText1 then // optional, check for a certain drawing editor
begin
Distance := 0;
Width := 0;
ExtraWidth := 0;
end;
end;
Of course we need code for the TListBox, too. The code uses the variable CurrField mentioned and assigned above.
procedure TForm1.PicklistClick(Sender: TObject);
var objlst : TWPTextObjList;
i : Integer;
s : string;
CurrentEditor : TWPCustomRTFedit;
begin
if (Sender AS TListBox).Parent is TWPCustomRTFedit then
begin
CurrentEditor := TWPCustomRTFedit( TListBox(Sender).Parent );
if TListBox(Sender).ItemIndex>=0 then
s := TListBox(Sender).Items[TListBox(Sender).ItemIndex]
else exit;
objlst := CurrentEditor.CodeListTags(wpobjMergeField,CurrField, true);
try
for i:=0 to objlst.Count-1 do
objlst[i].EmbeddedText := s;
finally
objlst.Free;
CurrentEditor.ReformatAll(false, true);
end;
TListBox(Sender).Visible := false;
CurrentEditor.Setfocus;
end;
end;
Basically we just locate the fields with the name CurrField and assign the selected text from the TListBox. Other than CurrField this code does not refer to any custom object or variable name and should work in your project nicely.