We've added a new component, TWPSuperPrint, that allows you to centrally manage a variety a WPTools printing features. Should you wish to, you also have the option of bypassing the Print Console, and controlling these aspects directly within your code, hidden from the user.
This component includes the ability to control:
| • | true "booklet-style" printing – the component has been optimized to automatically control "two up" (two pages per sheet) booklet printing |
| • | printing of labels (automatically tiled across the page! See other demo) |
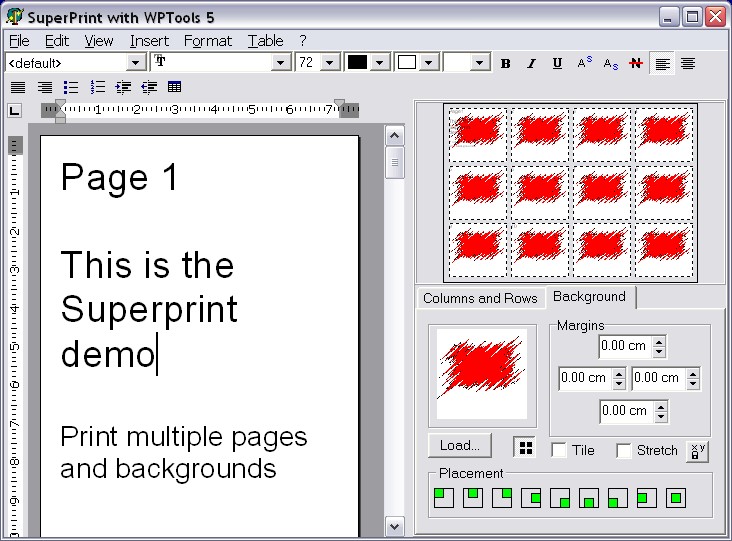
| • | include a background image, selected via a subdirectory browser |
| • | tiling or stretching of the included background image |
| • | placement of the background image either vertically or horizontally centered, left, right, top, or bottom, and combinations of those (e.g., vertically centered and horizontally centered, horizontally centered on the bottom, etc.) |
As mentioned, almost all the power and flexibility of the TWPSuperPrint component can be centrally controlled from within a dialog box-type form.
Please check out the LabelPrint demo to learn how to add simple label printing to your application.
For an example of this, see the "SuperPrint" example off of Demos\Tasks. Please feel free to use as much of that code as you wish (or the entire Print Console itself) in your own application.
The demo is written to be as generic as possible. Should you wish to customize the code, check out the assignments in FormCreate event (e.g., the EditBox and Preview properties), and tailor them to fit your particular case. Please note that the controls on the right hand side of the form could be easily copied and pasted into a different application.
To print a test booklet, simply select File / Print, everything is already set up in the demo. Out comes the pages, and correctly ordered! Optionally, if you have the product wPDF, also a PDF file can be created.
For the sake of simplicity, from here on we'll refer to the TWPSuperPrint component as WPSuperPrint1, or SuperPrint.
Booklet Printing
Let's talk about the booklet printing feature of this component.
This is driven by a single procedure, WPSuperPrint1.SetTwoUpBooklet(). When called with first parameter set to true, and then the printed page width and height in twips, a number of adjustments required to print in a booklet format are made behind the scenes - so that you (or the person running the application) don't have to. They include:
| • | setting the printer into Landscape |
| • | controls whether the page passed to it for printing is printed on the left or right half of the page |
| • | internally adjusts the page dimensions so that two pages can be printed on a sheet (more on this coming up) |
| • | sets the orientation of the TWPRichText component referred to by WPSuperPrint1.EditBox to Portrait (well, more accurately, it sets Landscape to False) |
| • | sets WPSuperPrint1's Columns property to 2, and its Rows property to 1 |
| • | sets WPSuperPrint1's Mode property to wpprPageColRows. This tells it how to calculate the page height and width |
| • | sets all of WPSuperPrint1's margins (left, right, top, and bottom) to 0, since we already have the margins in the text |
Note: be sure to set TwoUpBooklet to True prior to executing a Printer.BeginDoc statement. If you don't, SuperPrint's code that automatically changes the printer's Orientation to Landscape will have no effect.
One very important part of booklet printing is to determine the order that pages are sent to the printer. If we use as an example for this discussion a 12 page document, the pages would be ordered like this:
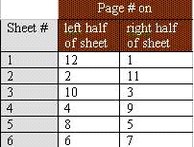
The first sheet contains the highest and lowest numbered page. The second sheet contains the second highest and lowest numbered pages.
Notice how on the first sheet, the even numbered page is positioned on the left half and the odd numbered page on the right . However, the second sheet reverses that – the odd page is on left, the even page on the right. WPSuperPrint1 automatically handles the left / right positioning, whichever is appropriate to the current sheet.
Your code is responsible for supplying SuperPrint with the page number to print. WPSuperPrint1's OnCalcPageNumber should point to your procedure that calculates the page number ordering. For example:
WPSuperPrint1.OnCalcPageNumber := DoCalcPage
The DoCalcPage procedure in the SuperPrint demo is a good example of how to calculate the page numbers. As written, it will work with documents any number of pages.
Another important part to using the TWPSuperPrint component is its Paint procedure. The demo's StartPrint procedure is a good example of setting up the call to WPSuperPrint1's Paint procedure, and the parameters passed to it.
A word about the call to RestoreValues in StartPrint. As mentioned above, SuperPrint internally adjusts page dimensions and orientation to print in booklet format. Therefore, you should store those properties somewhere (see the Demo's FormCreate event handler) so they can be restored after printing. And they should be saved prior to setting WPSuperPrint1's TwoUpBooklet property True. In the demo, that's what RestoreValues is about. And although the code to store the values is in FormCreate, that code could just as easily have been moved to the top of StartPrint.
Hint: By using a printer capable of supporting 11 inch x 17 inch paper, you can produce booklets with a page dimension of 8.5 inches by 11 inches (since the paper's orientation is switched to Landscape behind the scenes)!
Labels
To print labels, first, create the label (from within the TWPRichText component you assigned to the WPSuperPrint1.EditBox property), or import one into there. Then (in no particular order)
| • | set TwoUpBooklet to False |
| • | include the line: WPSuperPrint1.Mode := wpprLabels |
(where WPSuperPrint1 is the TWPSuperPrint component), or add a checkbox that you use to assign/unassign the Mode property
| • | set Columns to the number of labels you want across the page |
| • | set Rows to how many rows of labels you want across the page |
| • | set Copies to the product of Rows * Columns |
That's all you have to do to print labels!