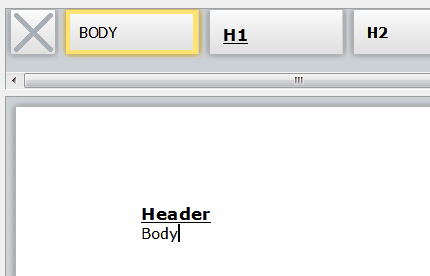
A text style is a collection of text attributes which are used for a certain text unless the text itself overrides the attributes. So if you have a style which defines two properties, the font name and the font size and assign it to some text this text will be displayed in the select font in the selected size. If the text was created to use the font size, ie. 10, this font size will be used and not the font size defined in the style.
Please note that borders can not be be defined in styles.
Text styles usually have names, for example "H1", "H2" or "Body". Using the names you can select a style from the list of styles and assign it to a paragraph. This assignment usually does not modify the attributes of the text.
The default attribute will be used for all the text which does not have an attribute in its own or is not using a style.
In this demo we initialize the default attribute using:
WPRichText1.DefaultAttr.SetFontName('Arial'); WPRichText1.DefaultAttr.SetFontSize(11); WPRichText1.WritingAttr.Clear;
WPRichText2.DefaultAttr.SetFontName('Courier New'); WPRichText2.DefaultAttr.SetFontSize(11); WPRichText2.WritingAttr.Clear;
|
It is very easy to share the same paragraph style sheet in several TWPRichText editors.
Simply drop a TWPRTFProps component on the form and add a reference to this instance in the property WPRTFPropsComponent of each of the TWPRichText.
You can double click on the WPRTFPropsComponent to create an initial set of styles.
Please note that a "WPRichText.Clear" will clear the styles, too. You need to use ClearEx to only delete the text.
The TWPStyleScroller inherits also from the editor class, but displays the styles as read-only tiles. If property "HasDefaultItem = true" it will display a first square item with an X. That is used to set the style reference to unassigned. Using property "Shaded" the design of the scroller can be switched. The property Aspect tells the component the aspect of the tiles, H=Aspect*W.

You need to set the property WPRTFPropsComponent of the WPStyleScroller, too. To link it to the editor(s) create a TActionList and add a WPToolsCustomEditContolAction. As property AttachedControl specify WPStyleScroller1. All affected editors should list the ActionList in property ActionList. This maks a 2 way update possible - the style scroller will highlight the current style and a click will change the style.
Hint:
In case you do not need different editors to share the same styles, you do not need an instance of the TWPRTFProps component.
TWPRichText will create its own.
In this case, just add one line the the Form.OnCreate event to make the StyleScroller work:
WPStyleScroller1.WPRTFPropsComponent := WPRichText1.RTFData.RTFProps;
With shared RTFProps it is easy to copy the current paragraph to a different TWPRichText
var par : TParagraph;
par := WPRichText1.ActiveParagraph.CreateCopyList(true, WPRichText1.ActiveParagraph);
WPRichText2.ActiveParagraph.NextPar := par;
WPRichText2.ReformatAll(false, true);
You can also copy the current table row to a table in a different TWPRichText
var par, aTable : TParagraph;
// Copy this row
par := WPRichText1.TableRow;
par := par.CreateCopyList(true, par);
// Insert a row - if necessary create a surrounding table object
// Insert after current row
if WPRichText2.TableRow<>nil then
WPRichText2.TableRow.NextPar := par
else
begin
// Create a new table
aTable := WPRichText2.ActiveParagraph.AppendNewTable(false);
// and insert the row
aTable.AppendChild(par);
end;
Alternative initialization for shared styles:
The event OnInitializeRTFDataObject can be used to assign a global TWPRTFProps component.
Please see demo "H) Techniques\Styles\GlobalStyles",
Do not forget to call DetachRTFData before the editor is destroyed.
procedure TWPGlobalStyleChild.WPRichText1InitializeRTFDataObject(
Sender: TObject; var RTFDataObject: TWPRTFDataCollection;
var RTFPropsObject: TWPRTFProps);
begin
RTFPropsObject := WPGlobalRTFProps;
// Don't forget to DETACH the object later!
end;
procedure TWPGlobalStyleChild.FormClose(Sender: TObject;
var Action: TCloseAction);
var i : Integer;
begin
Action := caFree;
WPGlobalRTFProps.DetachRTFData(WPRichText1.HeaderFooter); //DETACH!!!!
WPGlobalStyle.WPDefaultActions1.ControlledMemos.Remove(WPRichText1);
WPGlobalStyle.WPToolPanel1.RtfEdit := nil;
i := WPGlobalStyle.NameList.Items.IndexOf(Caption);
if i>=0 then
WPGlobalStyle.DataList.Strings[i] :=
WPRichText1.AsANSIString(IOFORMAT)
else
begin
WPGlobalStyle.NameList.Items.Add(Caption);
WPGlobalStyle.DataList.Append(WPRichText1.AsANSIString(IOFORMAT));
end;
end;