WPViewPDF PLUS has the ability to use a simple script to add text in different colors, font faces and sizes to defined positions on certain PDF pages. It is also possible to draw rectangles.
This can be useful to add information while printing PDF files or to add data permanently, i.e. fill out a form or contract.
New: The function pdfMerge can load a stamp script from a file using the option STAMPFILE=sometextfile.txt.
The script uses a very easy syntax which makes it possible to use precreated macros and just change data parts, for example by using the %s and %d format string used by Format() or sprint().
The X and Y offset values (X,Y,XOFF and YOFF command) can be used to move a precreated label to a different place on the page.
The data is added incrementally, this means normally each subsequent output is added to the existing. To avoid this, the command @cleartext has to be used to clear the previous script on the modified page.
Note: If @cleartext is used, it must be used after the command "PageNo=...".
The following command is used to add the script:
COMPDF_StampText
It just requires a string parameter. The string parameter is expected to be with a string list with strings separated by CR+NL.
If you build such a list in a TStringList object, You can use the "Text" property to read a string which can be used as parameter.
Example:
WPViewPDF1.CommandStrEx(
COMPDF_StampText,
MyParamStrings.Text,
0
)
Note: With the .NET assembly write Command(commands.COMPDF_StampText, ... )
The script can use this commands:
Change page numbering format when using macros.
NUMFORMAT=x
Possible values for x are:
1 this creates arabic numbers (default)
i this creates lowercase roman numbers
I create upper case roman numbers
a create lowercase letters, i.e. a b c d
A create uppercase letters, i.e. a b c d
Set a Pagenumber offset (default = 0)
NUMOFFSET=x
The offset added to the page number and the page count.
Important: NUMFORMAT and NUMOFFSET must be used before selection a range of pages using PageNo=...
Selects one ore more pages for the following output.
PAGENO=...
N is a page number between 1 and count of pages. Also possible are ranges and the text "ALL" to change all pages.
PageNo=N
PageNo=A-B
PageNo=N1,N2,N3,A-B
PageNo=ALL
This command removes all output from the currently selected page or pages. It must be used after "PageNo=..." otherwise you can see overprinting of text.
@ClearText
Select Color
Using the color command it is possible to set the font (and background) color as RGB (0..1) values, i.e. red:
Color=1 0 0
Color=0 0.1 1
LineColor=0 0 0 will set the line color for a rectangle.
Select the font
Font=Arial
Font=Courier New
Select the Size
Size=10
Select the coordinate origin - values are 0 - 4. This is useful to add page numbering in a certain distance from the page margin without knowing page size.
Origin=0 -> top left of the page, default
Origin=1 -> top right
Origin=2 -> bottom right
Origin=3 -> bottom left
Output Text:
Texts are printed like this:
X,Y=some text
To continue the text after the last character use "?"
?more text
Use "Lineheight", "LH" or "tl" to specify the line height
LH=20
To insert a new line use the command "CR" or "T*". TL must be used before CR!
CR
Example:
Color=0 0 0
tl=20
67,120=some text
CR
?more text
X and Y is the position of the start point in point coordinates (72 dpi) relatively to the Origin (default = top - left)
72,72=Text at one/one inch
Please note: The rotation specified for the PDF page is not evaluated!
Specify Offsets for next text and draw commands
Reset the offset:
X=xoffset
Y=yoffset
Modify the offset (add to offset):
XOFF=offset of xoffset
YOFF=offset of yoffset
(Please note that YOffset will be subtracted from the PDF coordinates since PDF coordinate system is bottom-up)
Switch off macros
MACROS=off
The following macros are understood to print page numbers unless "MACROS=off" was used:
[#] print the page number
[##] print the page count
[N] print a running number in the current range. (@RESETNR will set this to 1)
When lines have to be drawn this commands can be used:
Save saves the current graphic state, mainly the color for line and background
Restore restores the saved graphic state
M=x y move to a certain position. (x and y are delimited by a space!)
L=x y draw a line from last position to the new position
RE=x y w h draw a rectangle
S draw lines
F fill rectangles
B draw lines and fill.
linewidth sets the line width in pt
Unless S, F or B is used, no graphics will be visible!
Example 1 - draw underlined text
PageNo=1
@cleartext
253,260=AAAAAAAAAAAAAAAA
M=250 260
L=380 260
S
Example 2:
PageNo=1
@cleartext
Save
LineColor=1 0 0
LineWidth=3
re=94 152 198 67
S
Restore
TL=14
100,160=Line 1
CR
?Line 2
CR
?Line 3
Example 3 - draw a multiline stamp inside of a frame.
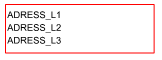
PageNo=1
@cleartext
Save
LineColor=1 0 0
X=100
Y=150
re=4 4 175 57
S
Restore
LH=15
6,20=ADRESS_L1
CR
?ADRESS_L2
CR
?ADRESS_L3
Example: draw a cross on all pages

PageNo=all
@cleartext
LW=5
LineColor=1 0 0
X=100
Y=100
M=0 0
L=200 50
M=200 0
L=0 50
S
Tip: The example program PDFView uses WPViewPDF1.CommandEx(COMPDF_SelectMode, 2); to activate the rectangle drawing mode in the viewer. After the user has drawn a rectangle the event OnSelRectEvent to add a X,Y position parameters to a stringlist. This makes it easy to locate the correct positions if You need to fill out a form.
procedure TWPViewPDFDemo.DoSelRectEvent(Sender: TObject; const PageNr : Integer; R : TRect);
begin
StampText.SetPageNo(PageNr+1);//............. add PageNo=... if it was not there
StampText.StampList.Lines.Append( IntToStr(R.Left) + ',' + IntToStr(R.Bottom) + '=' );
StampText.Show;
end;