In this chapter we show how to build an application which creates a certain report.
(full source in directory "Tasks\WPReporter_MasterClient")
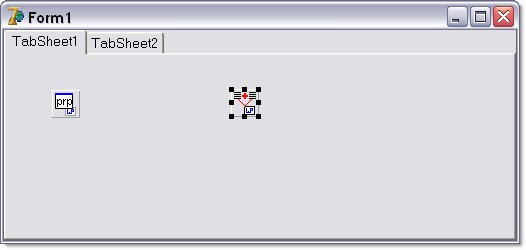
1) Create a form with a page control with 2 pages. The first page will be the template editor, the second page will display the complete report. You can easily hide the first page if you do not want to show your end user the editor.
Also drop a TWPReportBandsDialog and a TWPSuperMerge component.
2) Add a TWPToolBar, TWPRuler, a TWPRichText and also a TButton and connect the controls.
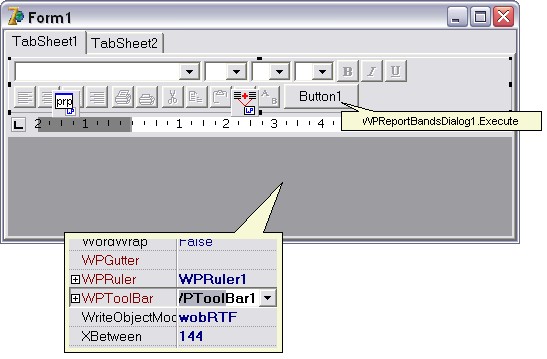
The button is used to show the WPReportBandsDialog1 which is used to add and delete bands.
3) Now please add a second TWPRichText on TabSheet2. We will use this second editor to show the created report. You can also hide the form completely and a TWPPreviewDlg ![]() instead. (Property EditBox set to WPRichText2)
instead. (Property EditBox set to WPRichText2)
4) Now configure the TWPSuperMerge component. This must be done in the OnCreate event of the form. (If you do not assign a RTFData the bands will be displayed as gray bars since no WPSuperMerge is active.)
procedure TForm1.FormCreate(Sender: TObject);
begin
WPSuperMerge1.SetSourceDest(
WPRichText1.Memo.RTFData,
WPRichText2.Memo.RTFData );
WPReportBandsDialog1.EditBox := WPRichText1;
end;
If you want to use section breaks in your template text you need to set the flag wpAllowSectionStartInHeaderFooterBands in property Options.
|
Note:
To preserve number- and paragraph styles the input and output should use, as described under "Shared Styles", the same RTFProps object.
You need a global variable
FAllProps: TWPRTFProps
which is assigned in the event used by both TWPRichText. In Form.OnDestroy theFAllProps has to be freed.
procedure TForm1.EditorInitializeRTFDataObject(Sender: TObject; var RTFDataObject: TWPRTFDataCollection; var FAllProps: TWPRTFProps); begin if FAllProps=nil then FAllProps := TWPRTFProps.Create; RTFPropsObject := FAllProps; end; |
Also configure the ReportBands dialog:
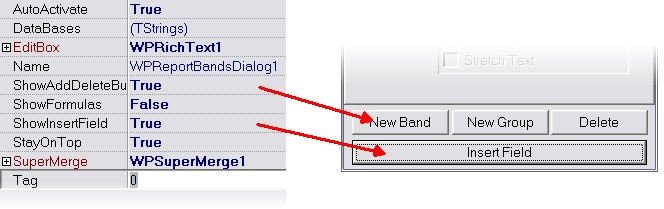
The property DataBases holds a string list with names which can be selected for the group bands. This names are used select a certain data set or to create and reset a query.
In our example we enter the strings CUSTOMERS and INVOICES.
Notes:
a) The InsertField dropdown is configured with the FieldNames property of the TWPSuperMerge.
When populating the drop down submenues are created by using the value of Fields[x].ParentDatasetDescription
b) If you use the report band dialog on a Dialog please call WPReportDlg1.Close when this dialog is closed. The report band dialog is a non-modal dialog and will not be closed otherwise.
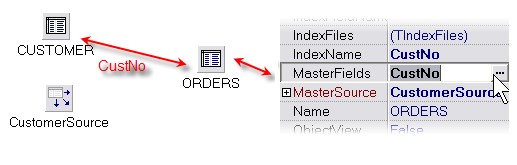
5) now its time to create and attach the data bases. To do so we create a separate data module. (In a real application you would use your existing data module)
For this demo we select the databases CUSTOMERS and ORDERS from the Borland demo database directory and set a master-detail relationship based on the field 'CustNo'.
6) In the event Form.OnShow we fill the field collection of the SuperMerge component. The field list is used to create the drop down menu for the InsertField menu of the ReportBand dialog. The collection can be also filled at design time. The field names can optionally use the syntax name=label_text. If the equation sign is used the part after it will be displayed in the insert-field menu of the report editor dialog. You can also insert the fields in your own code using InputMergeField.
procedure TForm1.FormShow(Sender: TObject);
var i : Integer;
begin
WPSuperMerge1.Fields.Clear;
with WPSuperMerge1.Fields.Add do
begin
ParentDatasetName := 'CUSTOMERS';
ParentDatasetDescription := 'Customer Data';
RequiredParentGroup := '';
for i:=0 to DataModule1.CUSTOMER.Fields.Count-1 do
FieldNames.Add( DataModule1.CUSTOMER.Fields[i].FieldName
+ '=' + DataModule1.CUSTOMER.Fields[i].DisplayLabel );
end;
with WPSuperMerge1.Fields.Add do
begin
ParentDatasetName := 'ORDERS';
ParentDatasetDescription := 'Orders';
RequiredParentGroup := 'ORDERS';
for i:=0 to DataModule1.CUSTOMER.Fields.Count-1 do
FieldNames.Add( DataModule1.ORDERS.Fields[i].FieldName
+ '=' + DataModule1.CUSTOMER.Fields[i].DisplayLabel );
end;
end;
Note: You can also use Fields.AddFields() with either an list or array of field names.
7) Now we want to implement a procedure which creates a generic template which works with our data.
Was add a button: ![]() and attach this code:
and attach this code:
procedure TForm1.CreateGroupsClick(Sender: TObject);
begin
WPSuperMerge1.AddReportGroup('CUSTOMERS',
[wpCreateBorders,wpCreateDataRow ],
nil, SetCellStyle, 2);
WPSuperMerge1.AddReportGroup('ORDERS',
[wpCreateBorders,wpCreateSmallHeaderRow,wpCreateDataRow,wpCreateSmallFooterRow ],
nil, SetCellStyle, 2);
end;
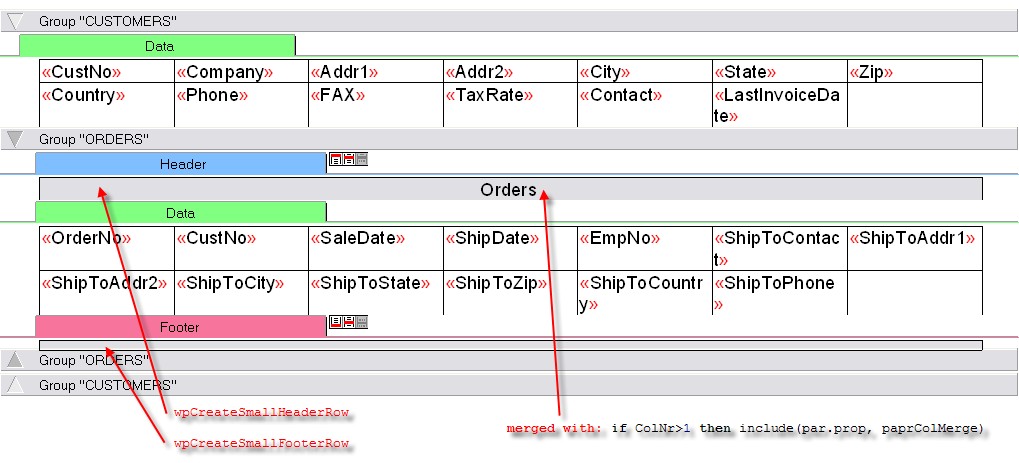
This code uses the procedure AddReportGroup which creates a group, optional with header and footer rows and with already inserted fields. It accepts a list of field names but can also collect the fields from the field names in the collection Field which we initialized in step (6).
Similar to you can use a callback which will be executed for each created cell. In this callback you can change the text and set properties for the cell. We use this callback.
procedure TForm1.SetCellStyle(RowNr, ColNr: Integer; par: TParagraph);
begin
if (RowNr<0) and ((RowNr and 1)=1) then // Header Rows
begin
par.ASetColor(WPAT_FGColor, clBtnFace);
if ColNr>1 then include(par.prop, paprColMerge)
else
begin
par.ASet(WPAT_Alignment, Integer(paralCenter));
par.SetText('Orders');
end;
end
else if (RowNr<0) and ((RowNr and 1)=0) then // Footer Rows
begin
par.ASetColor(WPAT_FGColor, clBtnFace);
par.ASet(WPAT_SpaceBetween, -100);
if ColNr>1 then include(par.prop, paprColMerge);
end;
end;
to get this report template as result:
8) Now we can add the logic to actually create the report.
We need an event handler for BeforeProcessGroup. Here we check if the 2 tables are at EOF and reset the client table.
procedure TForm1.WPSuperMerge1BeforeProcessGroup(Sender: TWPSuperMerge;
Band: TWPBand; Count: Integer; var CustomData: TObject; var ProcessGroup,
IsLastRun: Boolean);
begin
if Band.Alias='CUSTOMERS' then
begin
ProcessGroup := not DataModule1.CUSTOMER.Eof;
if ProcessGroup then
DataModule1.ORDERS.First;
end else
if Band.Alias='ORDERS' then
begin
ProcessGroup := not DataModule1.ORDERS.Eof;
end;
end;
In AfterProcessGroup we move to the next record.
procedure TForm1.WPSuperMerge1AfterProcessGroup(Sender: TWPSuperMerge;
Band: TWPBand; var CustomData: TObject; var Abort: Boolean);
begin
if Band.Alias='CUSTOMERS' then
begin
DataModule1.CUSTOMER.Next;
Abort := FALSE;
end else
if Band.Alias='ORDERS' then
begin
DataModule1.ORDERS.Next;
Abort := FALSE;
end;
end;
Now we need to merge in the data.
We use the event OnMailMergGetText. In this event we locate the field in the specified dataset and assign the contents. Of course it would be possible to use calculated fields or variables and constants, too!
procedure TForm1.WPSuperMerge1MailMergeGetText(Sender: TObject;
const inspname: String; Contents: TWPMMInsertTextContents);
var f : TField;
begin
if Contents.DatasetIs('ORDERS') then
f := DataModule1.ORDERS.FindField(Contents.FieldnamePart)
else f := DataModule1.CUSTOMER.FindField(Contents.FieldnamePart);
if f=nil then
Contents.StringValue := '' // undefined!
else Contents.StringValue := f.AsString;
end;
It is also possible to insert formatted text using the event OnMailMergGetText. For example if you have a letter stored in a database or a different editor. Simply assign RTF, WPTOOLS or HTML code to Contents.StringValue.
If the inserted text starts with a table we recommend to set the mail merge option mmDeleteThisField. With this option the fields are deleted in the destination editor. So no paragraph has to be created above a table to store the field markers.
procedure TWPRepForm.WPSuperMerge1MailMergeGetText(Sender: TObject;
const inspname: string; Contents: TWPMMInsertTextContents);
begin
if CompareText(inspname, 'RTFTEXT') = 0 then
begin
Contents.StringValue := ARTFTEXT.AsANSIString('RTF');
Contents.Options := Contents.Options + [mmDeleteThisField];
end else ....
end;
9) Almost complete - we want to show the update report when the active page in the page control is changed
procedure TForm1.PageControl1Change(Sender: TObject);
begin
if PageControl1.ActivePageIndex=1 then // Secod page then
begin
DataModule1.CUSTOMER.Open;
DataModule1.ORDERS.Open;
DataModule1.CUSTOMER.First;
WPRichText2.Clear;
WPRichText2.Header := WPRichText1.Header; // Assign page properties
WPSuperMerge1.Execute;
WPRichText2.DelayedReformat;
end;
end;
10) Improve the template
At runtime you can change the reporting template, add fields and also header and footer bands. You can delete rows, move fields, merge cells.
After some changes we got this template - still based on the automatic created template.
Tip: You can save the template as WPT file and load into WPRichText1 when you click on it inside the IDE with right mouse button.
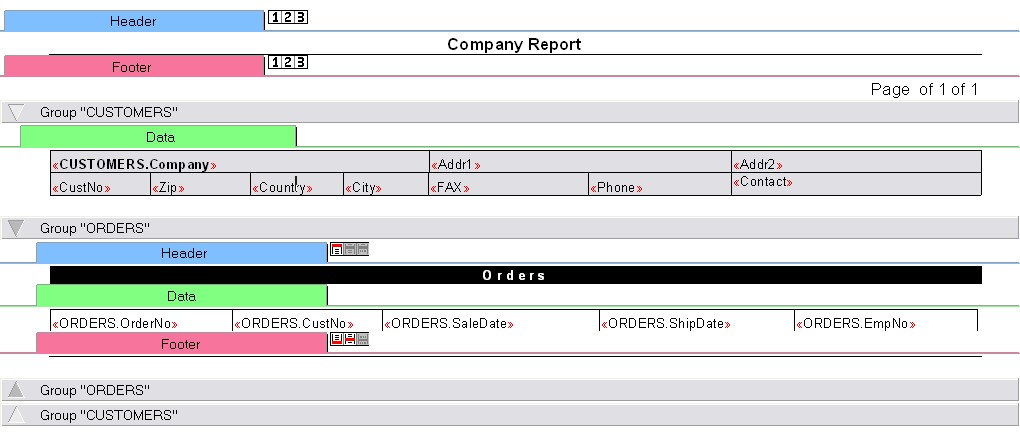
The first, new header and footer bands create page header and footer. The page numbers have been inserted with WPRichText1.InputTextField(wpoPageNumber) - this function can be also selected from the InsertField dropdown in the report editor dialog.
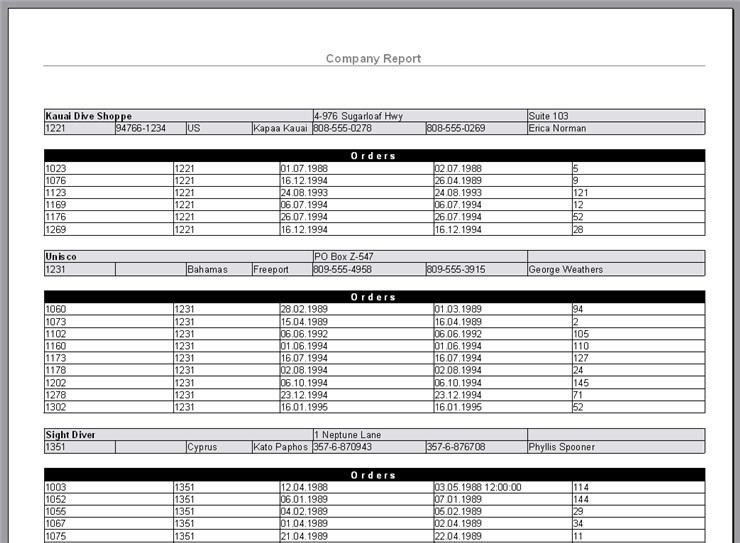
This is the created report:
Advanced Techniques:
Use the BeforeFormatTable event to for certain tables to be on one page.
Using the FormatOptions you can force all tables to be left intact (unless they are too long for a page).
WPRichText2.FormatOptions := [
wpfDontBreakTableRows,
wpDisableAutosizeTables,
wpfAvoidOrphans];
Using the RTFDataCollection event BeforeFormatTable you can enable this mode for certain tables:
WPRichText2.HeaderFooter.BeforeFormatTable := BeforeFormatTable;
procedure TWPRepTest.BeforeFormatTable(RTFData : TWPRTFDataCollection;
tablepar: TParagraph; var KeepTogether : Boolean);
begin
if tablepar.RowCount=2 then
KeepTogether := TRUE;
end;
Note: When the report is saved, the fields are still included. You can save the report to a compatible RTF file using SaveToFile(filename, 'RTF-IgnoreFields') to remove the fields.