We added an easy to understand demo which shows how to use the TWPSuperPrint component to add label printing to your application.
Note: Please also see the new integrated label printing feature which was added to WPTools 8!
The demo code has been created in a way which makes it easy to use it in your application.
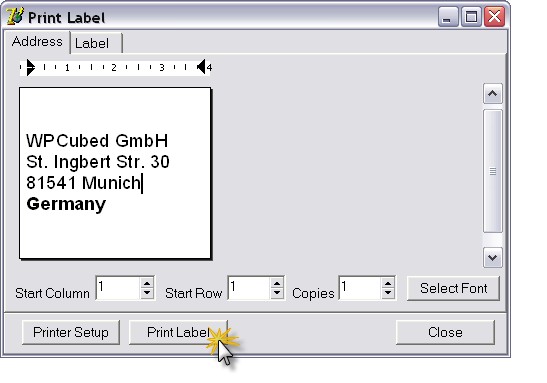
This is a screenshot of the main dialog - Page 1:
This is a screenshot of the main dialog - Page 2:
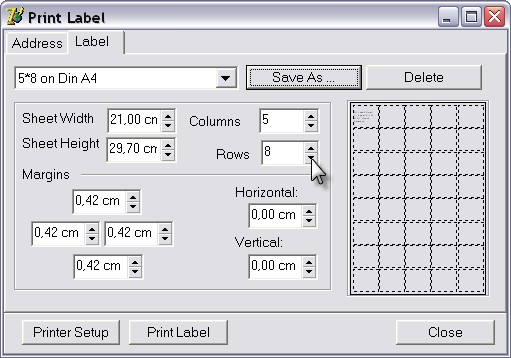
The code also implements loading and saving of the label definitions into one XML file which will be stored in the application root path.
The format used inside this XML file is:
<?xml version="1.0" encoding="windows-1250"?>
<Labels>
<Def Name="2*5_on_Din_A4">
<TopMargin>238</TopMargin>
<LeftMargin>238</LeftMargin>
<RightMargin>238</RightMargin>
<BottomMargin>238</BottomMargin>
<HorzMargin>0</HorzMargin>
<VertMargin>0</VertMargin>
<ColCount>2</ColCount>
<RowCount>5</RowCount>
<PageWidth>11906</PageWidth>
<PageHeight>16838</PageHeight>
</Def>
Note: The horizontal and vertical Margins are the small gaps BETWEEN labels - they are not the "pitch".
To use this form you only have to create and show it.
To load the first lines of the text into the label use the procedure LoadAddress.
Example:
procedure TForm1.Button1Click(Sender: TObject);
begin
WPLabelForm.LoadAddress( WPRichText1 );
WPLabelForm.Show;
end;
On the form the user can select a font, change the text and change the label definition.
If any of values, such as the count of columns, is changed, this procedure is executed:
procedure TWPLabelForm.ColCountChange(Sender: TObject);
begin
if FLocked then exit;
WPSuperPrint1.PageWidth := PageWidth.Value;
WPSuperPrint1.PageHeight := PageHeight.Value;
WPSuperPrint1.Rows := RowCount.IntValue;
WPSuperPrint1.Columns := ColCount.IntValue;
WPSuperPrint1.MarginTop := TopMargin.Value;
WPSuperPrint1.MarginLeft := LeftMargin.Value;
WPSuperPrint1.MarginRight := RightMargin.Value;
WPSuperPrint1.MarginBottom := BottomMargin.Value;
WPSuperPrint1.InbetweenHorz := HorzMargin.Value;
WPSuperPrint1.InbetweenVert := VertMargin.Value;
WPSuperPrint1.LabelStartRow := StartRow.Value;
WPSuperPrint1.LabelStartColumn := StartCol.Value;
WPSuperPrint1.Copies := Copies.Value;
WPRichText1.Header.SetPageWH(
WPSuperPrint1.Width,
WPSuperPrint1.Height,
0, 0, 0, 0);
WPRichText1.ReformatAll;
end;
It sets the properties of the SuperPrint component. After that the properties Width and Height which reflect the current label size are applied to the TWPRichText - it holds the text of the label and is used for the printing process.
The printing is started with this code:
procedure TWPLabelForm.Button1Click(Sender: TObject);
begin
Printer.Title := 'Label';
Printer.BeginDoc;
WPSuperPrint1.Paint(
Printer.Canvas,
-GetDeviceCaps(Printer.Handle, PHYSICALOFFSETX), // Offset in pixels
-GetDeviceCaps(Printer.Handle, PHYSICALOFFSETy), // Offset in pixels
GetDeviceCaps(Printer.Handle, LOGPIXELSY) / 1440, // Multiplicator for Parameters (twips->Canvas)
[wpDoNotScalePage]); // Options
Printer.EndDoc;
end;
It uses the Paint procedure of the SuperPrint component to render one page to the printer canvas. The physical offsets are passed as negative values to make sure the positions are acurate. Of course this offsets can be used to adjust the printing.