- Offizieller Beitrag
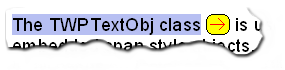
Instances of the TWPTextObj class with ObjType set to wpobjTextObj are used to display page numbers, time and similar fields. Unlike mail merge fields those objects are represented using just one character. So it is impossible to have a line wrap in the text.
Normally the objects are painted using an internal routine, so for objects with the name 'PAGE' the current page number is inserted.
The text objects are created using
WPRichText1.InputTextFieldName('CHANGEME');
To have a different text you can provide an event handler for the OnTextObjGetTextEx event:
procedure TForm1.WPRichText1TextObjGetTextEx(RefCanvas: TCanvas; TXTObject: TWPTextObj; var PrintString: WideString; var WidthInPix, HeightInPix: Integer; var PaintObject: TWPTextObj; Xres, YRes: Integer);begin if TXTObject.Name='CHANGEME' then begin PrintString := 'more...'; end;end;This will display the text object with the text "more..." using the attributes defined for that object.
It is very easy to create a different background color:
procedure TForm1.WPRichText1TextObjGetTextEx(RefCanvas: TCanvas; TXTObject: TWPTextObj; var PrintString: WideString; var WidthInPix, HeightInPix: Integer; var PaintObject: TWPTextObj; Xres, YRes: Integer);begin if TXTObject.Name='CHANGEME' then begin PrintString := 'more...'; RefCanvas.Brush.Color := clYellow; end;end;Now, if you want to make that object clickable you can add an event handler to the OnTextObjectClick event:
procedure TForm1.WPRichText1TextObjectClick(Sender: TWPCustomRtfEdit; pobj: TWPTextObj; obj: TWPObject; var ignore: Boolean);begin if (pobj.ObjType=wpobjTextObject) and (pobj.Name='CHANGEME') then begin // locate next data record or similar ... ShowMessage('Object ' + pobj.Name + ' was clicked!'); end;end;But what if you want to display some kind of graphic instead of the text?
Do not use the OnTextObjectPaint event for this - this event is used to draw embedded images only. Instead create an event handler for the objects own paint event:
procedure TForm1.OnPaintMarker(Sender : TWPTextObj; OutCanvas : TCanvas; XRes, YRes : Integer; X, Y, W, H, BASE: Integer );Assign the address of this paint event to the property TXTObject.OnPaint in the event OnTextObjGetTextEx and don't forget to also specify a width. The width is only used if the variable PaintObject has been set since otherwise always the PrintString is evaluated.
procedure TForm1.WPRichText1TextObjGetTextEx(RefCanvas: TCanvas;
  TXTObject: TWPTextObj; var PrintString: WideString; var WidthInPix,
  HeightInPix: Integer; var PaintObject: TWPTextObj; Xres, YRes: Integer);
begin
  if TXTObject.Name='CHANGEME' then
  begin
     WidthInPix := Xres div 5;
     TXTObject.OnPaint := OnPaintMarker;
     // This line is required:
     PaintObject :=  TXTObject;
  end;
end;


procedure TForm1.OnPaintMarker(Sender : TWPTextObj;
    OutCanvas  : TCanvas;
    XRes, YRes : Integer;
    X, Y, W, H, BASE: Integer );
var o : Integer;
begin
      OutCanvas.Brush.Color := clYellow;
      OutCanvas.RoundRect(x,y,x+w,y+h,XRes div 10, YRes div 10);
      OutCanvas.Pen.Color := clRed;
      o := XRes div 60;
      OutCanvas.Pen.Width := 0;
      OutCanvas.MoveTo(x + o*2, y + h div 2);
      OutCanvas.LineTo(x + w - o*3, y + h div 2);
      OutCanvas.MoveTo(x + w - o * 6, y + h div 2 - o * 3);
      OutCanvas.LineTo(x + w - o*3, y + h div 2);
      OutCanvas.LineTo(x + w - o * 6, y + h div 2 + o * 3);
end;This example will create the yellow maker: